
Many yoga postures are well-known and widely practised because they are employed in various exercises such as fitness and pilates or simply because human bodies naturally bend into certain positions.
Because practice makes perfect, we’ve detailed yoga positions or asanas (Sanskrit word) for total beginners to help them get started with yoga safely and quickly.
BEGINNERS’ YOGA PRIMER
Rather than travelling to yoga studios, you can try several beginner yoga postures on your own, taking your time to work progressively to understand the eventual goal of each asana.
Creating length or distance is a fundamental notion that can be applied to practically any yoga posture. In general, this can include making your spine appear longer. You can apply the same logic to your limbs. Make your limbs longer.
Another good idea is to promote stability. Stability can be a byproduct of length. It can also result from purposely stiffening joints or parts of the body or slowly activating specific muscles at once.
Take note of pressure at locations of contact as well. When balancing or maintaining balance, being mindful of floor contact can be crucial.
When first learning yoga asana (another word for posture or pose), aim to hold a position for five long, smooth breaths or, failing that, for a leisurely ten count. You can, of course, choose to save various stances for a more extended period of time.
BREATHING
A primary breathing option for the beginning is to breathe naturally via your nose. Allow yourself to breathe and concentrate on what you’re doing. Many yoga practitioners eventually embrace mindful-breathing?hsLang=en” rel=” no opener”>mindful breathing practices and incorporate them into their daily lives.
HOW OFTEN SHOULD A BEGINNER YOGA PRACTICE?
When starting out in yoga, a good objective is to practice three times per week, at least twice per week. If you adore yoga so much that you want to practice it all the time, try taking at least one day off every week.
WHEN SHOULD A YOGA SESSION BEGIN?
Yoga sessions can last anywhere from 20 minutes to two hours or more. What is more important is the quality of the time. When doing a yoga session, focus on what you are doing rather than how long it takes. On the other hand, the restorative, yin, and hatha yoga forms emphasize long holds in asanas.
DO YOU REQUIRE A YOGA MAT OR YOGA SUPPORT?
The major reason for using a yoga mat is to provide cushioning and grip, especially when sweating; however, you should be good for these fundamental yoga postures as long as you have a comfortable non-slip surface to work on.
A pair of yoga blocks may be useful, especially if your flexibility is limited, but if you don’t have any, you may use a strong chair. A belt or strap may also be useful, though you won’t need one for the poses listed here.
BEGINNER STANDING YOGA POSES
MOUNTAIN POSE DIFFERENT
The mountain position is often performed with your knees straight, your feet together, and your hands by your sides.
Beginners can benefit from doing this pose by alternately stretching and relaxing their spine, which you may accomplish without worrying about balance by doing it in a version with feet a comfortable distance apart and knees slightly bent.
Work your way down your spine by pulling your ears back and up. In order to achieve this, you can vary how far your head is pulled back and up, as well as the amount of chin lift. Try lifting or lowering your chin, then find the position that makes your neck feel long and comfortable.
As your head is pushed back and up, your chest will rise, extending your abdomen and possibly making your thoracic spine feel long. Make your lumbar spine feel long by gently pulling your ribcage up, away from your pelvis. Additionally, move your sacrum downward so your lower back feels comfortably long or “open.”
Once you’ve mastered making your spine feel long, repeat the action, alternately stretching and relaxing it, and then attempt it with your knees straight. You’ll be able to do this repeatedly in the standing postures that follow.
CHANGING YOUR WEIGHT FORWARD OR BACK
Play with moving your weight forwards and backwards to develop your body awareness.
Make sure your feet are at a comfortable distance from one another, and your knees are slightly bent. Shift forward so that your toes and forefeet press down with equal pressure. Your heels should be barely touching the ground. When your forefeet and heels press down evenly, your toes may relax.
You might do this while standing on one foot by transferring your weight to one foot and lifting the other foot just enough to lift it off the floor. Practice shifting your weight forward to your forefoot and toes, then back a tiny amount so that your forefoot and heel push down with even pressure.
When shifting back, whether on one or two feet, another alternative is to move all the way back to press down the rear edge of your heels; however, you may need to wave your arms to maintain balance in this posture.
THIS IS A SIMPLE GUIDE TO ONE-FOOT BALANCE
When practising any single-leg balancing posture, keep your weight shifted forward so that your forefoot and toes press into the floor. This makes it easier to balance and stay balanced.
SIDE BEND WHILE STANDING
A side bend can extend the side of your waist and the side of your ribcage, as well as the outside of one hip and the inside of the other.
Yoga practitioners standing inside bend.
It would be best if you began with your feet slightly apart and your knees straight. First, stretch your spine, then push your hips to the right as you bend your spine to the left. You can also reach one arm and then the other straight up and to the left, past your head.

Rather than simply holding the posture, try pushing your hips farther to the right while lengthening your spine (and arms) to the left with each inhalation, then relax while holding the shape of the pose with each exhalation.
Work on gradually lengthening and then relaxing.
Repeat many times, then switch sides.
BEGINNER STANDING YOGA SPINAL TWIST
The standing spinal twist, derived from the mountain pose, is a basic standing pose for beginners.
Stand in a modified mountain position, feet hip-width apart, knees straight, and arms at your sides.
Turn your pelvis to the right while keeping your feet and knees straight ahead. Turn your ribcage and then your head further to the right. Hold this position for five or so breaths or a ten count. Next, turn your pelvis to face the front while keeping your ribcage and head turned to the right. Hold this position for five to ten breaths and then rest.
You can repeat this a few times on one side before switching sides, or you can alternate sides each time.
CHAIR POSITION
A chair pose is not a pose done while sitting in a chair but rather a pose that appears to be done while sitting in a chair.
female instructor in chair posture utkatasana assisting in group yoga
For this beginner’s variation, start with your feet approximately hip-width apart, lengthen your spine, push your hips back, and bend your knees to about 90 degrees. Keep your weight concentrated between your forefeet and heels, or shift it forward to your forefoot and toes.
To make your legs feel more solid and stable, try pressing your forefeet into the floor without allowing your heels to lift. For an easy arm variant, reach your hands forwards, or reach your arms overhead with elbows straight for a more difficult variation.
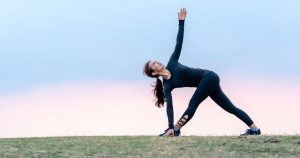
POSE IN A TRIANGLE
The triangle position is a traditional hatha yoga posture that can be found in the Ashtanga yoga standing sequence.
Step your feet about a leg’s length apart. Turn your right leg out about 90 degrees and keep both knees straight. Push your hips to the left and tip your upper body (pelvis and ribcage) to the right. Rest your bottom hand on your shin, or if you have one handy, a yoga block or, failing that, a chair. If you are flexible enough, you can also rest your hand on the floor.
Brace your legs and lift your bottom hand clear of your shin (or yoga block, chair, or floor).
woman doing yoga in triangle position trikonasana
To brace your legs and make it easier to lift your hand, press your forefeet firmly into the floor without allowing your heels to lift or shift your body. Another option for bracing your legs is to push your heels down firmly into the floor, with an accompanying activation of your leg muscles in either case.

To make the hand raise more difficult, stretch one or both arms to the right, past your head.
To stand, relax your arms and bend your knees; as you become more accustomed to this pose, try exiting it by standing using the strength of your legs while maintaining your knees straight; you can make this more difficult by keeping your arms stretching past your head as you stand.
Another possibility, especially when initially attempting this pose, is to bend one or both knees before standing.
POSE OF A TREE
While standing upright, shift your weight forward to your forefeet and toes, then shift to one leg and elevate the other leg, using your hand to hold your ankle and place the foot as high as possible against the thigh of your standing leg, Vrikshasana.
woman doing yoga while standing in tree posture
Bring your body upright and stretch your spine as you gradually press your foot into your inner thigh and release your hand. You can place your hands together in a prayer position, reach them out to the sides, or reach them up past your head.
To make this pose more accessible to beginners, avoid touching your foot to your inner thigh and instead stay balanced on one foot while the other knee is bent and directed to the side, with the foot lifted but not pressing against the standing leg.
This option is more difficult because you must engage the muscles of your lifted leg to maintain the leg lifted, but it can help with balance. For either option, keep your weight forward so that your standing leg, forefoot, and toes press down firmly on the floor.
STAYING BALANCED WITH YOUR EYES
Fix your gaze on one area and keep your eyes still when practising standing poses, especially when balancing.
Drishti is the technical term for gazing point, and you may see that a useful Drishti point is placed forwards and down during standing poses.
Experiment with how far forward and down your sight goes, and use a gazing point that makes it easier to stay balanced. I find that glancing downwards at a little inclination makes balance simpler, and you may discover that your balance seems surprisingly stable if you find the correct gazing position.
EAGLE POSE MODIFIED FOR BEGINNERS
Eagle posture is a variation on the Tree pose that includes a bind for the legs as well as the arms. A bind is when one portion of the body works against another part of the body. This modified version also contains a bind for the legs, but it has been changed.
(The entire version is depicted in the image below.)
Woman in eagle pose garudas ana yoga pose from a standing position, bend both knees and push your hips back down above your knees. Shift weight forwards to forefeet and toes. Then shift to one foot and cross the thigh of your unweighted leg across the thigh of your standing leg. You may need to use your hands to help push your thighs towards each other.
Try to bring the foot of your elevated leg into touch with the shin of your standing leg, and hold this posture for five long slow breaths or a slow ten count, then repeat on the other leg.
BENDING FORWARD STANDING
Many novices, or just individuals in general, like to be able to touch their toes while keeping their knees straight; you can practice this in standing forward bend, also known as Uttanasana.
For this variant, use a chair or yoga blocks.
Stand with your feet about hip-width apart and your knees straight. Slowly tilt your pelvis and ribcage forward, hinging your upper body towards the floor and your thighs. Place your hands on the edge of your chair, yoga blocks, or the floor if you can reach it. Use your arm muscles to press your palms or fingertips into the seat of your chair without allowing your upper body to lift or shift forward. Relax and repeat several times.
When you press your hands down, notice how your thighs’ back relaxes and how your thighs reactivate when you rest your hands, especially if you try to maintain your torso still. Take a few moments to rest, and then try standing forward bend again.
Place your hands on your chair again, this time focusing on the backs of your thighs. Try to deliberately activate the backs of your thighs, pause, and then relax them. You may notice that when you activate your thighs, your arms relax, and when you relax your thighs, your arms reactivate. Allow your forward bend to increase when the backs of your thighs are relaxed.
Attempt to deepen your forward bend while the backs of your thighs are active, and when standing back up, attempt to intentionally activate the muscles at the back of your legs so that you may use them to stand back up.
POSITIONS BASED ON THE FLOOR
BEGINNER MODIFIED DOWNWARD FACING DOG POSE
The knees are straight in a complete downward-facing dog adho mukha svanasana, with the heels ideally touching the floor; in this modified form, we’ll maintain the knees on the floor so you may focus on the actions of the arms, spine, and legs without having to work with flexibility limits.
Begin on all fours with your hands on the floor ahead of you, spread your fingers, and push the floor forwards, away from you. At the same time, press your forefeet down and push the floor backwards. Your arms and legs should feel active.
woman in yoga knees down downward dog posture
Keeping your arms and legs active, move your torso backwards, away from your hands, so that your spine and arms form one line when viewed from the side. Make the back of your neck feel long, and then try to maximize the distance between your hips and hands. Make the rest of your spine feel long, lengthening it away from your hands. Gaze at a point on the floor below your hips as a starting point.
Repeat three times, building up to holding for five deep breaths or a slow ten count. Because the head is below the hips, this position is similar to an inversion, and you may find that even this simple variation is incredibly peaceful, especially if you fix your gaze on one area.
VARIATIONS OF DOWNWARD FACING DOG POSE FOR BEGINNERS
woman practising downward facing dog adho mukha svanasanaFrom the previous version of the downward-facing dog, try the same actions with your knees lifted but still bent, pushing your ribcage back, away from your hands, while continuing to press forward with your hands and back with your feet.
The following version can be done with your knees straight but your heels lifted as high as possible, and the last version can be done with your knees straight but your heels sinking to the floor. To get your heels closer to the floor, focus on creating an upward pull on the fronts of your feet.
POSE, PLANK
Before the plank pose, a simple shoulder action that you can practice while sitting upright is moving your shoulders forward. Notice how your shoulder blades spread apart as you do so. Relax and repeat a few times. Then try it with your arms reaching forwards. Note the feeling of space you get between your shoulder blades when you spread them. Also, notice how your arms seem to become longer when you move your shoulders forward.
Now, while lying on your back, place your wrists under your shoulders and your knees under your hips, do the same thing; spread your shoulder blades, and your ribcage will lift as a result. Pull your ears away from your shoulders so that the back of your neck feels long. Step one leg back at a time without allowing your pelvis to lift or move.
LOCUST
When doing poses like an upward-facing dog, which is common in vinyasa yoga, flow yoga, power yoga, and ashtanga yoga, it is important to keep your spinal erectors active. These muscles run up the back of the torso on either side of the spinal column and can be exercised simultaneously with the Locust pose.
Lie on your stomach with your arms and legs straight and your arms beside you. Slowly lift your chin off the floor, noticing the sensation at the back of your neck as the muscles there activate to help lift your head. You can look down, bringing your chin to your chest and thus making the back of your neck feel long, or look up slowly, bending your neck backwards.
Repeat three or more times to get a feel for it, resting in between sets, and try to hold the head lifted position for five long slow breaths or a slow ten count.
After that, reach your legs back with your knees straight so that your legs feel long, and gradually lift the front of your ribcage off the floor, bending backwards so that it slowly peels off the floor. Your legs may lift, which is fine, but try to keep them on the floor.
Lift and lower gently three to five times, working up to holding the raised position for five or more long slow breaths or a slow ten count.
woman in locust yoga position
Notice the sensations along your spine and at the backs of your ribs while sustaining the elevated position; to raise your ribcage higher, work on increasing the backward pull on the backs of your ribs (towards the backs of your hip bones).
RESTING
It is essential to rest at the end of yoga practice. This is a chance to relax in general, but in terms of yoga practice, it is a chance for your body and mind to assimilate the experiences of the poses you’ve just done. For the resting pose, known as the corpse pose, lie on your back with arms and legs spread out and palms facing upwards.
Yoga class, corpse pose (savasana).
However, as you practice more, you may notice that your mind is silent when you eventually get to the corpse pose. Allow yourself at least five minutes in corpse pose if time allows, and then focus on bringing the peace you get from yoga to live outside your yoga pose practice.


